Asymmetrical Shell Crochet Tutorial from Bethintx1 on YouTube
Wednesday, February 22, 2012
Under the Sea (of yarn, that is!)

Asymmetrical Shell Scarf in Purple
My most favorite places I've been to involve a beach. I love everything that has to do with water and the beach. During family vacations, I would literally swim all day long. I would only come back inside to eat, sleep or go to the bathroom. That was unless there was some kind of storm or no one wanted to be out on the beach to watch me as a kid. I remember one time I got burned so bad from the sun from swimming all day. I remember putting on a lot of sunscreen that day but I must have forgotten to put it on early enough from the last application. I was burned so bad that my skin turned brown and crispy. It was so tight that it would split. It was worth it to me at the time. I still love swimming but don't often get to go.
Today I'd like to share with you the asymmetrical shell stitch. It looks wonderful and is a breeze to make a scarf using the pattern. I came across a neat video from Bethintx1 on YouTube. She's the one who taught me how to make this beautiful scarf. Even though I want to keep this scarf for myself, I think I should donate it. I'll make a few more scarves so I can donate several at one time. I'm not sure yet who to donate but I think someone else would love this. I will post the tutorial I followed to make this in another post.

Asymmetrical Shell Scarf in Brown
The brown scarf is the first asymmetrical shell project I've done. I used up a partial skein of some yarn someone gave to me. The purple one I made on the way down to Kansas City. My family, friends and I were all headed down to the Chiefs Packers game when I made it. Too bad the Packers lost. It was a lot of fun seeing part of downtown Kansas City at night. It was almost like summer when we had made it down. 50 degrees f is almost shorts weather if you come down from the North!
Thursday, February 16, 2012
Simple Shawls

Winter Shawl

Dancing Shawl
To be honest, I don't really have much of a pattern for making these shawls. I just chained up until the size I wanted and then single crocheted down the row, chained one, turned and single crocheted in the back loop for each row. When I did the fringe, I just cut a lot of small pieces and tied them on to the edges of the shawl.
Wednesday, February 8, 2012
Crochet Large Rose Tutorial by Bethintx1
Crochet Large Rose Part 1 of 3 By Bethintx1 on YouTube
Crochet Large Rose Part 2 of 3 by Bethintx1 on YouTube
Crochet Large Rose Part 3 of 3 (Leaves) by Bethintx1 on YouTube
Roses are Pink, Roses are Blue...

Rose
Valentine's Day is coming up and that makes me think of roses. I enjoy seeing the many varieties and colors they come in. The neatest rose I've seen would have to be the blue rose. I was so excited when I saw one for the first time. It's nice to see something so unique once in a while. I remember when my husband used to get me a rose for each month we were together as boyfriend and girlfriend. He told me he wanted to do that for as long as he could. That only lasted for about 6 or 7 months. Then he got me plants every now and then. I have a green thumb and absolutely love fresh flowers.
On another note, I wanted to show you these lovely roses I've made. The top one was the first rose I've ever crocheted. I thought it would be hard to do but it was so simple that I could do this in my sleep. Bethintx1 on YouTube had a tutorial on how to make these roses. Below is an example of how I used my rose as an applique.

Wine Bottle Cover With Rose
I just really liked making this rose that I made one for this wine bottle cover. I just love the colors! One thing you'll notice is that I like to work with a lot of bright and pastel colors. It can be hard for me to work with darks as I don't seem to understand that palette as much. I keep working on darks once in a while just to get out of my comfort zone. Speaking of which, I made another wine bottle cover with very different colors. I didn't follow the same rose pattern though. I was trying to make a hibiscus flower and it didn't look good so I frogged this pattern and turned it into a variegated rose. I apologize I won't be able to share that pattern. I don't know how I made it.

Dark Wine Bottle Cover With Variegated Rose
So there you have it. I will share Bethintx1's YouTube tutorial I followed in another post.
Friday, February 3, 2012
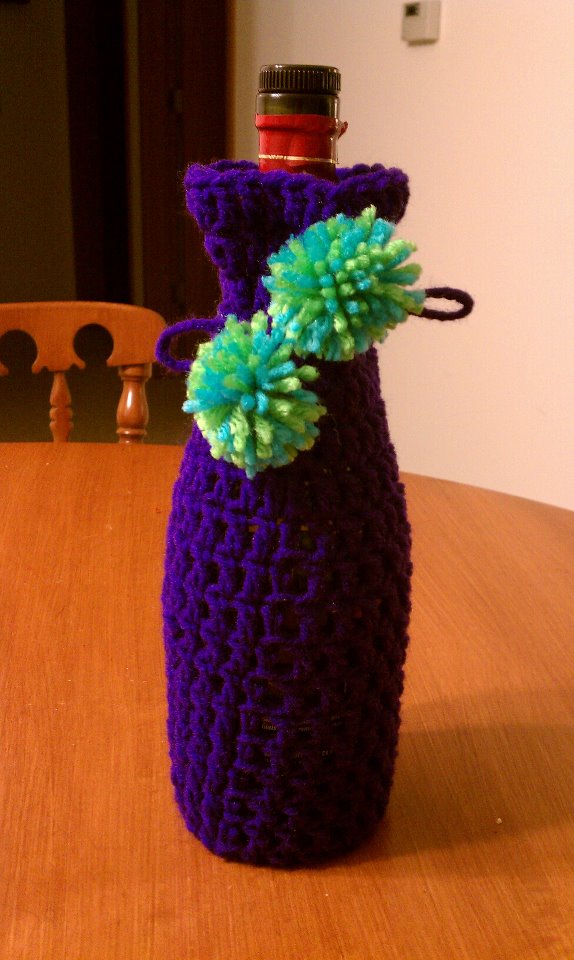
How to Make a Wine Bottle Cover

Simple Wine Bottle Cover
Wine bottle covers are very easy to make and take very little time. Here is the pattern I use to make mine:
WHAT YOU NEED:
-1 skein 4-ply worsted weight yarn (you don't need much) for body
-extra yarn for pom-poms using different colors
-yarn needle
-scissors
-size I 9 crochet hook
-pom-pom maker or just use a couple of your fingers
BODY
Chain 4, Slip Stitch to beginning loop, Chain 2
Double Crochet in center loop 12 times, join with beginning round Double Crochet using Slip Stitch, Chain 2
Double Crochet twice in each stitch around for a total of 24 Double Crochets, join to beginning round Double Crochet using Slip Stitch, Chain 2
Double Crochet into BACK loop in each stitch around for edging, Slip Stitch to beginning round Double Crochet, Chain 2
For the next 16 turns:
Double Crochet in each stitch around, Slip Stitch to beginning round Double Crochet, Chain 2
To end:
Double Crochet in each stitch around, Slip Stitch to beginning round Double Crochet, tie off and hide tails
DRAWSTRING
Braid 3 strands of yarn to desired length (start with about an arm's length and go from there). Tie off with only one knot on each end, leaving a little extra undone yarn. Snake in between every other crochet stitch on the third row down from the body of your wine bottle cover until ends meet. Make 2 pom-poms that are about 1". To do that you can either use a pom-pom maker or wrap yarn around your fingers, tie off and cut the loops. Tie pom-poms to the ends of your drawstring.
Thursday, February 2, 2012
Wednesday, February 1, 2012
A Great Way to Keep your Beer and Soda Cold

Can Cozy
I really have been making a lot of progress with crochet ever since I followed Bethintx1 on YouTube. In the picture above, you see a can cozy I made by using her tutorial. It's really nice because it is machine washable. Can cozies are one of the simplest things to make. It was my first time I had ever worked on making a round of any type. I like to make a lot of things using the ideas of this pattern. Here are some things I made on my own by altering the pattern a little bit:
Wine Bottle Cover

Yarn Needle Container
The wine bottle covers are really nice. I just made a bunch of extra rounds and then developed my own drawstring. I have had some requests for these and I am more than happy to make them. This is a great gift idea, especially since it will keep chilled wines cold longer.
As for the Yarn Needle Container, I had the idea of sticking all of my tapestry needles in an old pill bottle container. That way I don't keep losing them. I thought the bottle needed some spunk from that ugly orange. I just worked my way up to just the right size for the container. At the end of my work, I fished through some yarn through the bottle's safety retainer part and tied the whole thing onto the bottle. Now I know the cover won't just slip off every time I open it for a needle. I then took a large button and hot glued that into the top. Then I hot glued some strands of yarn on the edges of the button and put a ribbon flower in the middle. Not bad for an ugly pill bottle container.
Subscribe to:
Posts (Atom)